View绘制流程分析

View绘制也是Android里重要知识点,明晰此流程方便我们了解Android的布局设置和自定义View。

View结构

Activity里包含了一个Window实现类PhoneWindow,而该类内部包含了一个DecorView对象,该DectorView对象是所有应用窗口(Activity界面)的根View。DecorView包含了一个WindowDecorActionBar和android.R.id.content的View,我们平时实现Activity自定义布局通过setContentView即填充此View。
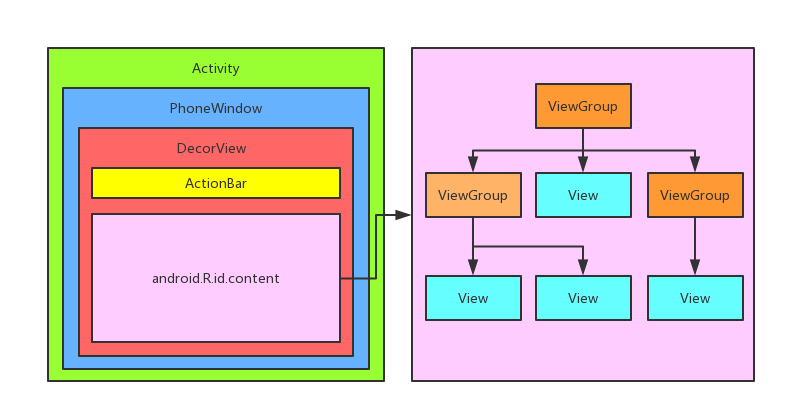
  • Activity:Activity是一个应用程序组件,用于实现用户交互。
  • Window:它概括了Android窗口的基本属性和基本功能。其实现类是PhoneWindow。
  • WindowManager:负责管理Window窗口。其实现类是WindowManagerImpl。
  • WindowManagerGlobal:应用内单例,管理应用内所有View、ViewRootImpl、WindowManager。
  • WindowManangerService:简称WMS,它是系统服务类,作用是管理所有应用程序中的窗口。
  • DecorView:界面的根View,PhoneWindow的内部类。
  • ViewRootImpl:ViewRoot是GUI管理系统与GUI呈现系统之间的桥梁。
  • View:作为所有图形的基类。
  • ViewGroup:对View继承扩展为视图容器类。

setContentView流程

Activity在onCreate时,通过setContentView实现了加载自定义布局。

1
2
3
4
public void setContentView(View view) {
getWindow().setContentView(view);
initWindowDecorActionBar();
}

PhoneWindow创建

首先PhoneWindow是在Activity的attach方法中创建的,PhoneWindow会设置一个WindowManager,所以每个Activity都会对应一个Window,Window会对应一个WindowManager。

1
2
3
4
5
6
7
8
9
10
11
12
13
14
final void attach(...) {
...
mWindow = new PhoneWindow(this, window, activityConfigCallback);
...
mWindow.setWindowManager(
(WindowManager)context.getSystemService(Context.WINDOW_SERVICE),
mToken, mComponent.flattenToString(),
(info.flags & ActivityInfo.FLAG_HARDWARE_ACCELERATED) != 0);
if (mParent != null) {
mWindow.setContainer(mParent.getWindow());
}
mWindowManager = mWindow.getWindowManager();
...
}

PhoneWindow的setContentView

1
2
3
4
5
6
7
8
9
10
11
12
13
14
15
16
public void setContentView(int layoutResID) {
if (mContentParent == null) {
// 初始化DecorView
installDecor();
} else if (!hasFeature(FEATURE_CONTENT_TRANSITIONS)) {
mContentParent.removeAllViews();
}

if (hasFeature(FEATURE_CONTENT_TRANSITIONS)) {
...
} else {
// // 自己设置的布局填充到mContentParent这里
mLayoutInflater.inflate(layoutResID, mContentParent);
}
...
}

初始化DecorView

1
2
3
4
5
6
7
8
9
10
11
12
private void installDecor() {
if (mDecor == null) {
// 创建DecorView
mDecor = generateDecor();
...
}
if (mContentParent == null) {
// 创建布局
mContentParent = generateLayout(mDecor);
// ... 初始化一堆属性值
}
}

创建DecorView

1
2
3
4
5
6
7
8
9
10
11
12
13
14
15
16
17
18
protected DecorView generateDecor(int featureId) {
Context context;
// 判断是否使用ApplicationContext
if (mUseDecorContext) {
Context applicationContext = getContext().getApplicationContext();
if (applicationContext == null) {
context = getContext();
} else {
context = new DecorContext(applicationContext, getContext().getResources());
if (mTheme != -1) {
context.setTheme(mTheme);
}
}
} else {
context = getContext();
}
return new DecorView(context, featureId, this, getAttributes());
}

创建布局

1
2
3
4
5
6
7
8
9
10
11
12
13
14
15
protected ViewGroup generateLayout(DecorView decor) {
...
// ... 依据主题style设置一堆值进行设置requestFeature

// 把布局文件添加到DecorView对象里,并且指定contentParent值
mDecor.onResourcesLoaded(mLayoutInflater, layoutResource);

ViewGroup contentParent = (ViewGroup)findViewById(ID_ANDROID_CONTENT);
if (contentParent == null) {
throw new RuntimeException("Window couldn't find content container view");
}

// 继续一堆属性设置,完事返回contentParent ...
return contentParent;
}

加载布局

1
2
3
4
5
6
7
8
9
10
11
12
13
14
15
16
17
18
19
20
21
void onResourcesLoaded(LayoutInflater inflater, int layoutResource) {
...

mDecorCaptionView = createDecorCaptionView(inflater);

// 通过LayoutInflate填充自定义的layout
final View root = inflater.inflate(layoutResource, null);
// 将找到的系统布局,添加到DecorView
if (mDecorCaptionView != null) {
if (mDecorCaptionView.getParent() == null) {
addView(mDecorCaptionView, new ViewGroup.LayoutParams(MATCH_PARENT, MATCH_PARENT));
}
mDecorCaptionView.addView(root,
new ViewGroup.MarginLayoutParams(MATCH_PARENT, MATCH_PARENT));
} else {

addView(root, 0, new ViewGroup.LayoutParams(MATCH_PARENT, MATCH_PARENT));
}
mContentRoot = (ViewGroup) root;
initializeElevation();
}

创建WindowDecorActionBar

1
2
3
4
5
6
private void initWindowDecorActionBar() {
...
// 初始化WindowDecorActionBar
mActionBar = new WindowDecorActionBar(this);
...
}

整个setContentView流程如下:

  1. 在Activity生命周期attach方法里面创建出PhoneWindow;
  2. 调用PhoneWindow的setContentView方法;
  3. 在PhoneWindow里面创建DecorView,DecorView会去加载系统的一个布局;
  4. 将自己写的布局填充到DecorView布局里面id为android.R.id.content的View里。
  5. 初始化WindowDecorActionBar。

至此DecorView创建完毕,布局添加完成。

LayoutInflate流程

上面在分析setContentView过程中可以看见,以下两步利用了LayoutInflate加载布局:

  • PhoneWindow的setContentView中的mLayoutInflater.inflate(layoutResID, mContentParent);
  • PhoneWindow的generateLayout中的View in = mLayoutInflater.inflate(layoutResource, null);

LayoutInflate.inflate

1
2
3
4
5
6
7
8
9
10
11
12
public View inflate(@LayoutRes int resource, @Nullable ViewGroup root, boolean attachToRoot) {
final Resources res = getContext().getResources();
...

// 加载布局资源
final XmlResourceParser parser = res.getLayout(resource);
try {
return inflate(parser, root, attachToRoot);
} finally {
parser.close();
}
}
1
2
3
4
5
6
7
8
9
10
11
12
13
14
15
16
17
18
19
20
21
22
23
24
25
26
27
28
29
30
31
32
33
34
35
36
37
38
39
40
41
42
43
44
45
46
47
48
49
50
51
52
53
54
55
56
57
58
59
60
61
62
63
64
65
66
67
68
69
70
71
72
73
74
75
76
77
78
79
80
81
82
83
public View inflate(XmlPullParser parser, @Nullable ViewGroup root, boolean attachToRoot) {
synchronized (mConstructorArgs) {
Trace.traceBegin(Trace.TRACE_TAG_VIEW, "inflate");

final Context inflaterContext = mContext;
final AttributeSet attrs = Xml.asAttributeSet(parser);
Context lastContext = (Context) mConstructorArgs[0];
mConstructorArgs[0] = inflaterContext;

// 定义返回值,初始化为传入的形参root
View result = root;

try {
// Look for the root node.
int type;

// 如果一开始就是END_DOCUMENT,那说明xml文件有问题
while ((type = parser.next()) != XmlPullParser.START_TAG &&
type != XmlPullParser.END_DOCUMENT) {
// Empty
}

// //有了上面判断说明这里type一定是START_TAG,也就是xml文件里的root node
if (type != XmlPullParser.START_TAG) {
throw new InflateException(parser.getPositionDescription()
+ ": No start tag found!");
}

final String name = parser.getName();

...

// 处理<merge>的情况
if (TAG_MERGE.equals(name)) {
if (root == null || !attachToRoot) {
throw new InflateException("<merge /> can be used only with a valid "
+ "ViewGroup root and attachToRoot=true");
}

// 递归inflate方法
rInflate(parser, root, inflaterContext, attrs, false);
} else {
///xml文件中的root view,根据tag节点创建view对象
final View temp = createViewFromTag(root, name, inflaterContext, attrs);

ViewGroup.LayoutParams params = null;

if (root != null) {
if (DEBUG) {
System.out.println("Creating params from root: " +
root);
}
// 根据root生成合适的LayoutParams实例
params = root.generateLayoutParams(attrs);
if (!attachToRoot) {
// 如果attachToRoot=false就调用view的setLayoutParams方法
temp.setLayoutParams(params);
}
}

...

// 递归inflate剩下的children
rInflateChildren(parser, temp, attrs, true);

...

// root非空且attachToRoot=true则将xml文件的rootview添加到root里
if (root != null && attachToRoot) {
root.addView(temp, params);
}

// 否则置为空
if (root == null || !attachToRoot) {
result = temp;
}
}

// ..。 处理异常情况
// 返回xml里解析的root view
return result;
}
}

rInflate

rInflateChildren底层也是调用了rInflate方法,因此核心看rInflate如何递归处理xml里的tag。

1
2
3
4
5
6
7
8
9
10
11
12
13
14
15
16
17
18
19
20
21
22
23
24
25
26
27
28
29
30
31
32
33
34
35
36
37
38
39
40
41
42
43
void rInflate(XmlPullParser parser, View parent, final AttributeSet attrs,
boolean finishInflate, boolean inheritContext) throws XmlPullParserException,
IOException {

final int depth = parser.getDepth();
int type;
// XmlPullParser解析器的标准解析模式
while (((type = parser.next()) != XmlPullParser.END_TAG ||
parser.getDepth() > depth) && type != XmlPullParser.END_DOCUMENT) {
// 找到START_TAG节点程序才继续执行这个判断语句之后的逻辑
if (type != XmlPullParser.START_TAG) {
continue;
}
// 获取Name标记
final String name = parser.getName();
// 处理REQUEST_FOCUS的标记
if (TAG_REQUEST_FOCUS.equals(name)) {
parseRequestFocus(parser, parent);
} else if (TAG_TAG.equals(name)) {
// 处理tag标记
parseViewTag(parser, parent, attrs);
} else if (TAG_INCLUDE.equals(name)) {
// 处理include标记
if (parser.getDepth() == 0) {
//include节点如果是根节点就抛异常
throw new InflateException("<include /> cannot be the root element");
}
parseInclude(parser, parent, attrs, inheritContext);
} else if (TAG_MERGE.equals(name)) {
// merge节点必须是xml文件里的根节点(这里不该再出现merge节点)
throw new InflateException("<merge /> must be the root element");
} else {
// 其他自定义节点
final View view = createViewFromTag(parent, name, attrs, inheritContext);
final ViewGroup viewGroup = (ViewGroup) parent;
final ViewGroup.LayoutParams params = viewGroup.generateLayoutParams(attrs);
rInflate(parser, view, attrs, true, true);
viewGroup.addView(view, params);
}
}
// parent的所有子节点都inflate完毕的时候回onFinishInflate方法
if (finishInflate) parent.onFinishInflate();
}

上面方法主要就是循环递归解析xml文件,解析结束回调View类的onFinishInflate方法。

1
2
protected void onFinishInflate() {
}

View类的onFinishInflate方法是一个空方法。当我们自定义View时在构造函数inflate一个xml后可以实现onFinishInflate这个方法一些自定义的逻辑。

DecorView和PhoneWindow

布局加载之后,接下来则需要进行绘制。

Activity在onResume前,ActivityThread会在handleResumeActivity里调用makeVisible,将DecorView添加到WindowManager上并显示。

1
2
3
4
5
6
7
8
void makeVisible() {
if (!mWindowAdded) {
ViewManager wm = getWindowManager();
wm.addView(mDecor, getWindow().getAttributes());
mWindowAdded = true;
}
mDecor.setVisibility(View.VISIBLE);
}

WindowManager的实现类是WindowManagerImpl,通过addView将DecorView添加到ViewRootImpl上。

1
2
3
4
5
@Override
public void addView(@NonNull View view, @NonNull ViewGroup.LayoutParams params) {
applyDefaultToken(params);
mGlobal.addView(view, params, mContext.getDisplay(), mParentWindow);
}

接着调用WindowManagerGlobal的addView。

1
2
3
4
5
6
7
8
9
10
11
12
13
14
15
16
17
18
19
20
21
public void addView(View view, ViewGroup.LayoutParams params,
Display display, Window parentWindow) {
ViewRootImpl root;
View panelParentView = null;
...
root = new ViewRootImpl(view.getContext(), display);
view.setLayoutParams(wparams);
// mViews用来保存根布局(mDecor)
mViews.add(view);
// mRoots用来保存ViewRootImpl(此类用来关联View和ViewManager)
mRoots.add(root);
// mParams用来保存布局的属性
mParams.add(wparams);

try {
// ViewRootImpl.setView实现绘制
root.setView(view, wparams, panelParentView);
} catch (RuntimeException e) {
...
}
}

最后在ViewRootImpl里,实现界面绘制。

1
2
3
4
5
6
7
8
9
10
11
12
13
14
15
16
17
18
19
20
21
22
23
24
25
26
27
28
29
30
31
32
33
34
35
36
37
38
39
40
41
42
43
public void setView(View view, WindowManager.LayoutParams attrs, View panelParentView) {
...
requestLayout();
...
}

public void requestLayout() {
if (!mHandlingLayoutInLayoutRequest) {
// 检查不是UI线程则报错
checkThread();
mLayoutRequested = true;
scheduleTraversals();
}
}

void scheduleTraversals() {
...
// 此处调用TraversalRunnable的线程方法,执行doTraversal()
mChoreographer.postCallback(
Choreographer.CALLBACK_TRAVERSAL, mTraversalRunnable, null);
...
}

final class TraversalRunnable implements Runnable {
@Override
public void run() {
doTraversal();
}
}

void doTraversal() {
if (mTraversalScheduled) {
mTraversalScheduled = false;
mHandler.getLooper().getQueue().removeSyncBarrier(mTraversalBarrier);

...

// 最终的绘制方法
performTraversals();

...
}
}

ViewRootImpl.performTraversals

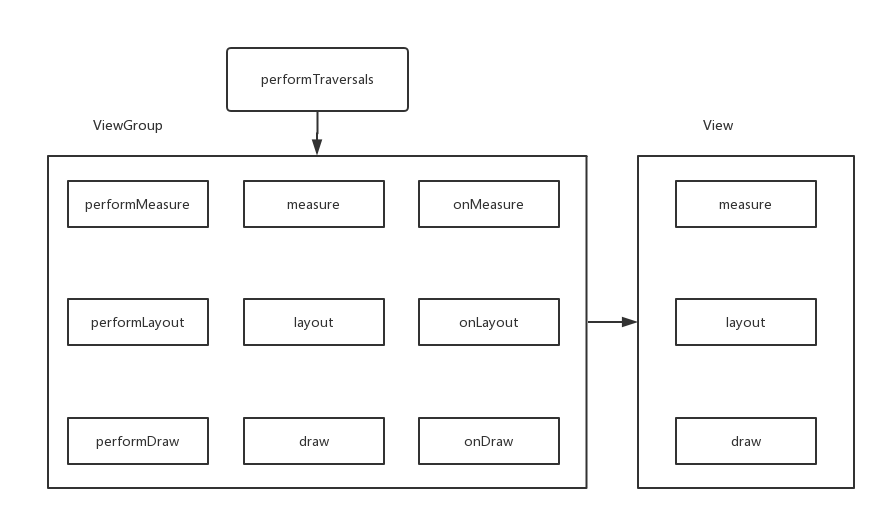
上面分析了从Activity到PhoneWindow到DecorView的绘制流程。根据前述流程,在id为android.R.id.content的View我们使用自定义layout的xml文件填充后,进行View树的绘制,绘制则是通过ViewRootImpl.performTraversals实现的。

1
2
3
4
5
6
7
8
private void performTraversals() {
...
performMeasure(childWidthMeasureSpec, childHeightMeasureSpec);
...
performLayout(lp, mWidth, mHeight);
...
performDraw();
}

核心就是上述三个方法:

  • performMeasure:负责测量控件大小;
  • performLayout:负责摆放控件位置;
  • performDraw:负责绘制控件。

在performMeasure前,通过getRootMeasureSpec方法去计算预期宽高,作为参数传入,平时我们自定义View的Measure参数就是这样一层一层传下来的。

1
2
3
4
5
6
7
8
9
10
11
12
13
14
15
16
17
18
19
int childWidthMeasureSpec = getRootMeasureSpec(mWidth, lp.width);
int childHeightMeasureSpec = getRootMeasureSpec(mHeight, lp.height);

private static int getRootMeasureSpec(int windowSize, int rootDimension) {
int measureSpec;
switch (rootDimension) {

case ViewGroup.LayoutParams.MATCH_PARENT:
measureSpec = MeasureSpec.makeMeasureSpec(windowSize, MeasureSpec.EXACTLY);
break;
case ViewGroup.LayoutParams.WRAP_CONTENT:
measureSpec = MeasureSpec.makeMeasureSpec(windowSize, MeasureSpec.AT_MOST);
break;
default:
measureSpec = MeasureSpec.makeMeasureSpec(rootDimension, MeasureSpec.EXACTLY);
break;
}
return measureSpec;
}
  • MATCH_PARENT和具体大小则对应MeasureSpec.EXACTLY,设置为Window大小或者是具体大小。
  • WRAP_CONTENT则对应MeasureSpec.AT_MOST,设置为控件大小。

performMeasure

1
2
3
4
5
private void performMeasure(int childWidthMeasureSpec, int childHeightMeasureSpec) {
...
mView.measure(childWidthMeasureSpec, childHeightMeasureSpec);
...
}

这里的mView即DecorView,也就是FrameLayout.onMeasure,实现父View的测量。

1
2
3
4
5
6
7
8
9
10
11
12
13
14
15
16
17
18
19
20
21
22
23
24
25
26
27
28
29
30
31
32
33
34
35
36
37
38
39
40
41
42
43
44
45
46
47
48
49
50
51
52
53
54
55
56
57
58
59
60
61
62
63
64
65
66
67
68
69
70
71
72
73
74
75
76
77
78
79
80
81
82
83
84
85
86
87
88
89
90
91
protected void onMeasure(int widthMeasureSpec, int heightMeasureSpec) {
int count = getChildCount();

final boolean measureMatchParentChildren =
MeasureSpec.getMode(widthMeasureSpec) != MeasureSpec.EXACTLY ||
MeasureSpec.getMode(heightMeasureSpec) != MeasureSpec.EXACTLY;
mMatchParentChildren.clear();

int maxHeight = 0;
int maxWidth = 0;
int childState = 0;

// 循环遍历子控件
for (int i = 0; i < count; i++) {
final View child = getChildAt(i);
if (mMeasureAllChildren || child.getVisibility() != GONE) {
measureChildWithMargins(child, widthMeasureSpec, 0, heightMeasureSpec, 0);//测量子空间间距
final LayoutParams lp = (LayoutParams) child.getLayoutParams();
maxWidth = Math.max(maxWidth,
child.getMeasuredWidth() + lp.leftMargin + lp.rightMargin);
maxHeight = Math.max(maxHeight,
child.getMeasuredHeight() + lp.topMargin + lp.bottomMargin);
childState = combineMeasuredStates(childState, child.getMeasuredState());
if (measureMatchParentChildren) {
if (lp.width == LayoutParams.MATCH_PARENT ||
lp.height == LayoutParams.MATCH_PARENT) {
mMatchParentChildren.add(child);
}
}
}
}

// 计算内边距(padding)
maxWidth += getPaddingLeftWithForeground() + getPaddingRightWithForeground();
maxHeight += getPaddingTopWithForeground() + getPaddingBottomWithForeground();

// 检查最小的高度和宽度
maxHeight = Math.max(maxHeight, getSuggestedMinimumHeight());
maxWidth = Math.max(maxWidth, getSuggestedMinimumWidth());

// 检查前景的最小宽度和高度
final Drawable drawable = getForeground();
if (drawable != null) {
maxHeight = Math.max(maxHeight, drawable.getMinimumHeight());
maxWidth = Math.max(maxWidth, drawable.getMinimumWidth());
}

// setMeasuredDimension存储测量尺寸
setMeasuredDimension(resolveSizeAndState(maxWidth, widthMeasureSpec, childState),
resolveSizeAndState(maxHeight, heightMeasureSpec,
childState << MEASURED_HEIGHT_STATE_SHIFT));

// 测量子控件大小
count = mMatchParentChildren.size();
if (count > 1) {
for (int i = 0; i < count; i++) {
final View child = mMatchParentChildren.get(i);
final MarginLayoutParams lp = (MarginLayoutParams) child.getLayoutParams();

final int childWidthMeasureSpec;
if (lp.width == LayoutParams.MATCH_PARENT) {
final int width = Math.max(0, getMeasuredWidth()
- getPaddingLeftWithForeground() - getPaddingRightWithForeground()
- lp.leftMargin - lp.rightMargin);
childWidthMeasureSpec = MeasureSpec.makeMeasureSpec(
width, MeasureSpec.EXACTLY);
} else {
childWidthMeasureSpec = getChildMeasureSpec(widthMeasureSpec,
getPaddingLeftWithForeground() + getPaddingRightWithForeground() +
lp.leftMargin + lp.rightMargin,
lp.width);
}

final int childHeightMeasureSpec;
if (lp.height == LayoutParams.MATCH_PARENT) {
final int height = Math.max(0, getMeasuredHeight()
- getPaddingTopWithForeground() - getPaddingBottomWithForeground()
- lp.topMargin - lp.bottomMargin);
childHeightMeasureSpec = MeasureSpec.makeMeasureSpec(
height, MeasureSpec.EXACTLY);
} else {
childHeightMeasureSpec = getChildMeasureSpec(heightMeasureSpec,
getPaddingTopWithForeground() + getPaddingBottomWithForeground() +
lp.topMargin + lp.bottomMargin,
lp.height);
}
//调用子控件的测量方法
child.measure(childWidthMeasureSpec, childHeightMeasureSpec);
}
}
}

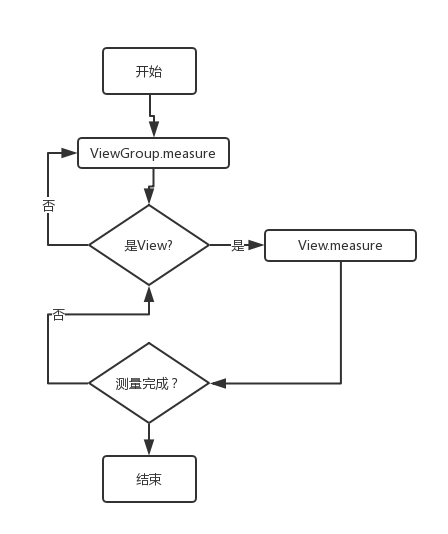
再来看看子View的measure,measure的主要目的就是对View树中的每个View的测量宽高进行赋值,所以一旦这两个变量被赋值意味着该View的测量工作结束。

1
2
3
4
5
6
7
8
9
10
11
// final方法不可复写,已经我们自定义View只能覆写onMeasure方法
public final void measure(int widthMeasureSpec, int heightMeasureSpec) {
...
onMeasure(widthMeasureSpec, heightMeasureSpec);
...
}

protected void onMeasure(int widthMeasureSpec, int heightMeasureSpec) {
// 存储测量宽高
setMeasuredDimension(getDefaultSize(getSuggestedMinimumWidth(), widthMeasureSpec), getDefaultSize(getSuggestedMinimumHeight(), heightMeasureSpec));
}

setMeasuredDimension用于存储测量的宽高值,getDefaultSize用于根据不同测量模式计算最终设置的大小值,getSuggestedMinimumHeight则对应xml里的android:minHeight字段判断最小值是否小于minHeight。

1
2
3
4
5
6
7
8
9
10
11
12
13
14
15
16
17
18
19
20
21
public static int getDefaultSize(int size, int measureSpec) {
int result = size;
// MeasureSpec前2位代表测量模式
int specMode = MeasureSpec.getMode(measureSpec);
// MeasureSpec后30位代表大小值
int specSize = MeasureSpec.getSize(measureSpec);

switch (specMode) {
// 不确定大小,不常用
case MeasureSpec.UNSPECIFIED:
result = size;
break;
// 表示最大大小,对应wrap_content
case MeasureSpec.AT_MOST:
// 表示确定大小,对应match_parent或者具体大小
case MeasureSpec.EXACTLY:
result = specSize;
break;
}
return result;
}

上面说了View实际是嵌套的,而且measure是递归传递的,所以每个View都需要measure。实际能够嵌套的View一般都是ViewGroup的子类,所以在ViewGroup中定义了measureChildren, measureChild等方法来对子视图进行测量。

1
2
3
4
5
6
7
8
9
10
11
12
13
14
15
16
17
18
19
20
protected void measureChildren(int widthMeasureSpec, int heightMeasureSpec) {
final int size = mChildrenCount;
final View[] children = mChildren;
for (int i = 0; i < size; ++i) {
final View child = children[i];
if ((child.mViewFlags & VISIBILITY_MASK) != GONE) {
measureChild(child, widthMeasureSpec, heightMeasureSpec);
}
}
}

protected void measureChild(View child, int parentWidthMeasureSpec,
int parentHeightMeasureSpec) {
final LayoutParams lp = child.getLayoutParams();

final int childWidthMeasureSpec = getChildMeasureSpec(parentWidthMeasureSpec, mPaddingLeft + mPaddingRight, lp.width);
final int childHeightMeasureSpec = getChildMeasureSpec(parentHeightMeasureSpec, mPaddingTop + mPaddingBottom, lp.height);

child.measure(childWidthMeasureSpec, childHeightMeasureSpec);
}

至此View的measure过程就完成了。

最后通过一个图总结下上述流程:

performLayout

1
2
3
4
5
6
7
8
9
10
11
12
13
private void performLayout(WindowManager.LayoutParams lp, int desiredWindowWidth, int desiredWindowHeight) {
...
final View host = mView;
...
host.layout(0, 0, host.getMeasuredWidth(), host.getMeasuredHeight());
...
}

public void layout(int l, int t, int r, int b) {
...
onLayout(changed, l, t, r, b);
...
}

ViewRootImpl的performLayout调用了DecorView的layout方法,具体布局实现为onLayout方法。

1
2
3
protected void onLayout(boolean changed, int left, int top, int right, int bottom) {
// empty
}

View里的onLayout为空方法,因为无子控件需要摆放,我们在自定义View时,如果View是子View一般也无需覆写onLayout方法。

再看看DecorView即FrameLayout的onLayout方法:

1
2
3
4
5
6
7
8
9
10
11
12
13
14
15
16
17
18
19
20
21
22
23
24
25
26
27
28
29
30
31
32
33
34
35
36
37
38
39
40
41
42
43
44
45
46
47
48
49
50
51
52
53
54
55
56
57
58
59
60
61
62
63
64
65
66
67
68
69
70
protected void onLayout(boolean changed, int left, int top, int right, int bottom) {
layoutChildren(left, top, right, bottom, false /* no force left gravity */);
}

void layoutChildren(int left, int top, int right, int bottom, boolean forceLeftGravity) {
final int count = getChildCount();

final int parentLeft = getPaddingLeftWithForeground();
final int parentRight = right - left - getPaddingRightWithForeground();

final int parentTop = getPaddingTopWithForeground();
final int parentBottom = bottom - top - getPaddingBottomWithForeground();

// 遍历子View
for (int i = 0; i < count; i++) {
final View child = getChildAt(i);
// 如果不是GONE隐藏则需要进行摆放
if (child.getVisibility() != GONE) {
final LayoutParams lp = (LayoutParams) child.getLayoutParams();

final int width = child.getMeasuredWidth();
final int height = child.getMeasuredHeight();

int childLeft;
int childTop;

int gravity = lp.gravity;
if (gravity == -1) {
gravity = DEFAULT_CHILD_GRAVITY;
}

final int layoutDirection = getLayoutDirection();
final int absoluteGravity = Gravity.getAbsoluteGravity(gravity, layoutDirection);
final int verticalGravity = gravity & Gravity.VERTICAL_GRAVITY_MASK;

switch (absoluteGravity & Gravity.HORIZONTAL_GRAVITY_MASK) {
case Gravity.CENTER_HORIZONTAL:
childLeft = parentLeft + (parentRight - parentLeft - width) / 2 +
lp.leftMargin - lp.rightMargin;
break;
case Gravity.RIGHT:
if (!forceLeftGravity) {
childLeft = parentRight - width - lp.rightMargin;
break;
}
case Gravity.LEFT:
default:
childLeft = parentLeft + lp.leftMargin;
}

switch (verticalGravity) {
case Gravity.TOP:
childTop = parentTop + lp.topMargin;
break;
case Gravity.CENTER_VERTICAL:
childTop = parentTop + (parentBottom - parentTop - height) / 2 +
lp.topMargin - lp.bottomMargin;
break;
case Gravity.BOTTOM:
childTop = parentBottom - height - lp.bottomMargin;
break;
default:
childTop = parentTop + lp.topMargin;
}

// 子View再进行layout处理
child.layout(childLeft, childTop, childLeft + width, childTop + height);
}
}
}

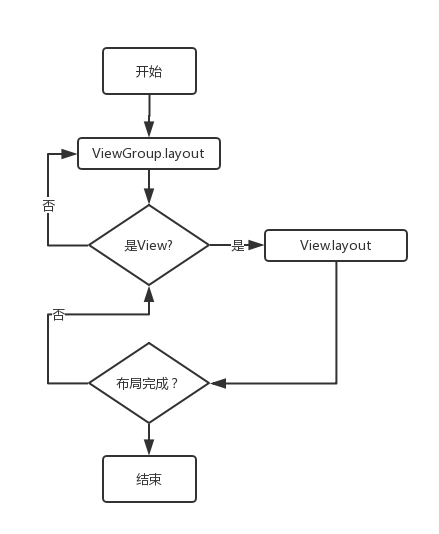
和measure流程类似,也是从父View到子View递归实现Layout布局。

至此View的layout过程就完成了。

用一张图来总结performLayout过程:
performDraw

测量和布局完成后,则进行绘制。

1
2
3
4
5
6
7
8
9
10
11
12
13
14
15
16
17
private void performDraw() {
...
draw(fullRedrawNeeded);
...
}

private void draw(boolean fullRedrawNeeded) {
...
drawSoftware(surface, mAttachInfo, xOffset, yOffset, scalingRequired, dirty);
...
}

private boolean drawSoftware(Surface surface, AttachInfo attachInfo, int xoff, int yoff, boolean scalingRequired, Rect dirty) {
...
mView.draw(canvas);
...
}

实际上也是用了DecorView即FrameLayout.draw,FrameLayout.draw则是调用View.draw实现。

1
2
3
4
5
6
7
8
9
10
11
12
13
14
15
16
17
18
19
20
21
22
23
24
25
26
27
28
29
30
31
32
33
34
35
36
37
38
39
40
41
42
43
44
45
46
47
48
49
50
51
public void draw(Canvas canvas) {
...
// Step 1, 绘制背景
int saveCount;

if (!dirtyOpaque) {
drawBackground(canvas);
}

...
// Step 2, 保存图层layer
saveCount = canvas.getSaveCount();

...
// Step 3, 绘制控件视图
if (!dirtyOpaque) onDraw(canvas);

...
// Step 4, 绘制子控件视图
dispatchDraw(canvas);

...
// Step 5, 绘制渐变边缘和恢复图层layer
if (drawTop) {
...
canvas.drawRect(left, top, right, top + length, p);
}

if (drawBottom) {
...
canvas.drawRect(left, bottom - length, right, bottom, p);
}

if (drawLeft) {
...
canvas.drawRect(left, top, left + length, bottom, p);
}

if (drawRight) {
...
canvas.drawRect(right - length, top, right, bottom, p);
}

canvas.restoreToCount(saveCount);

...
// Step 6, 绘制前景
onDrawForeground(canvas);

...
}

draw的官方注释已经很详细了,主要分为6个步骤:

  1. 绘制背景
  2. 保存图层layer
  3. 绘制控件视图
  4. 绘制子控件视图
  5. 绘制渐变边缘和恢复图层layer
  6. 绘制前景

至此View的draw过程就完成了。

0%